Simple wooden shelves on a rope or rope will help not only to rationally organize the space, but also to decorate the room with a handmade product, give exclusivity and special charm. Such shelves will perfectly fit into eco-style and country style, suitable for both minimalist interiors and loft rooms..
Creating hanging shelves with your own hands is not as difficult as it might seem at first glance. And there are several advantages in this solution: firstly, the product will turn out to be exclusive, the second one will not be exactly the same. Secondly, it will not be necessary to make a lot of holes in the wall to hang several shelves at once..
If you like to bring a variety of souvenirs from your travels, build decorative compositions for the holidays, for example, fabulous villages for the New Year – try to make a convenient and original shelf for them with your own hands.

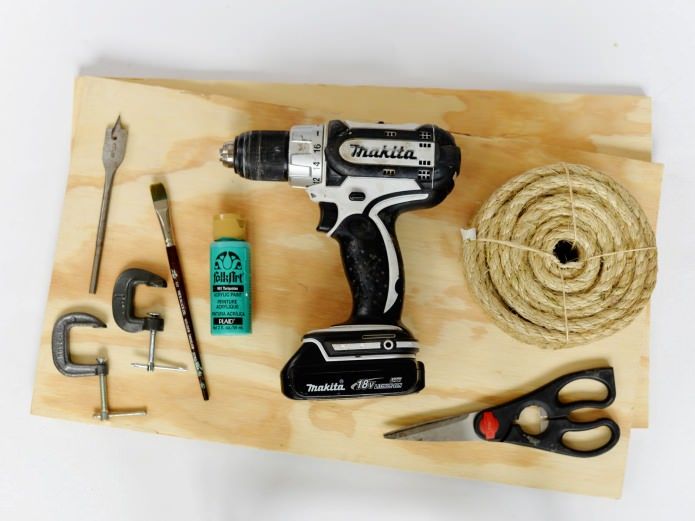
Required tools and materials:
- Drill with drill;
- rope or thick rope;
- scissors;
- paints, brushes (optional);
- wooden blanks for shelves;
- optional: building clamps.
Blanks
Align the wooden blanks in size and shape – they must match. If necessary, file with a hacksaw, this is necessary so that the shelves hang straight. Then carefully process the blanks with sandpaper – first coarse, then fine.
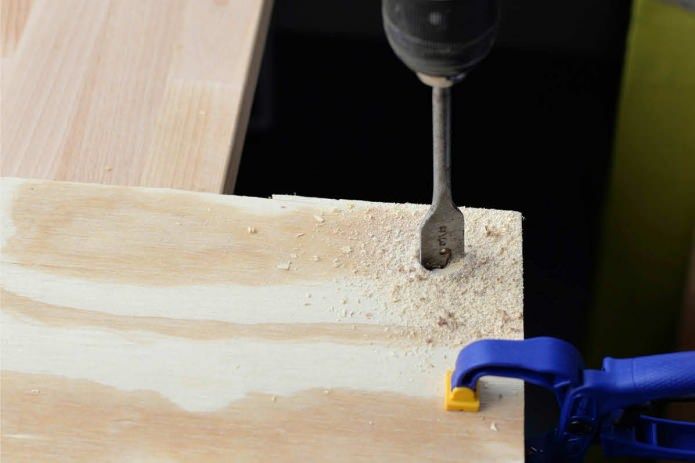
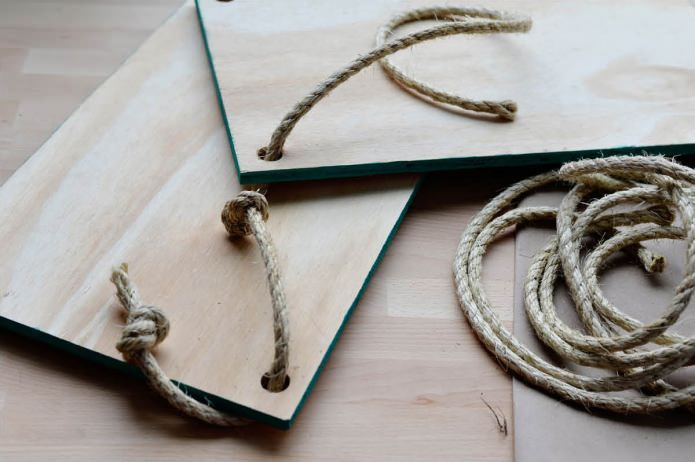
Holes
A crucial stage in the manufacture of shelves on a rope is drilling holes. Fold the future shelves together, and firmly fasten together. This is best done with building clamps. If they are not there, you will have to mark the places for drilling holes on each shelf separately, while trying to keep them exactly in the same places, strictly under each other – otherwise the shelf will skew when hanging.
Choose a drill bit of such a diameter that your rope or rope will easily pass through the hole. So, if the diameter of the rope is about 10 mm, then the drill should be about 16 mm in diameter..
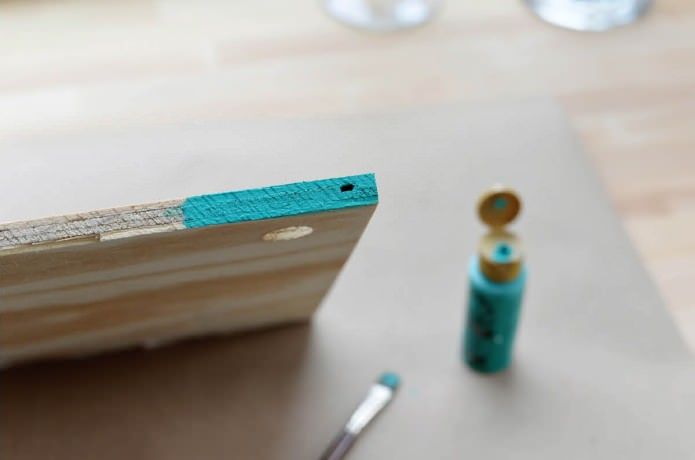
Coloration
To make the do-it-yourself hanging shelves look more interesting, they can be painted – completely or partially, for example, only the end parts. Choose colors in accordance with the colors of your interior. They can merge with the general background, or be contrasting, playing the role of a decorative accent. Here you can experiment and show your artistic taste and imagination.
Rope
You will need four ropes of the same length. Which one – it depends on the height of the ceilings and the level at which the shelf will hang. Taking into account the knots, a small margin must be added to the measured length. You can always cut off excess.

Assembly
Making the original shelf with your own hands is almost finished. It remains to collect all the parts together. To do this, tie a knot on each of the pieces of rope on which the lower part will rest. Thread through the holes, tie a knot on each rope again – these knots will hold the shelf motionless.
Measure the distance to the second shelf, tie it again in a knot, thread it through the holes of the second shelf, and again make a knot on each rope. The main thing is that the distances from knot to knot are the same on all parts of the rope..
Your rope shelf is ready! Now you need to connect all four segments together with a reliable knot and hang it. Depending on the length of the structure, it can be attached either directly to the knot, or an additional rope of the required length can be tied to it..

Now you can place souvenirs, postcards, watches, figurines or your favorite collection of trinkets on the finished shelf.